With as many homes as I've inspected, I'm surprised to see that so many areas are not insulated properly and are not to today's standards. Homeowners need more information in order to bring their home up to par. They can save themselves a lot of money on heating costs and roofing materials and at the same time prevent mold build-up due to improper installation of insulation. My applications apply to the Massachusetts area only and may change slightly due to the region you live in. Check with your municipal codes before applying your insulation. (Example: Insulation vapor retarder is reversed in hotter climates and depths of insulation may differ, depending on where you live.)
Now I'd like to illustrate to home owners "HOW TO PROPERLY UPGRADE INSULATION IN YOUR HOME".
Very surprisingly, while most insulation is relatively very simple to install in a typical home, I often find that the attics are the most problematic areas. Both the insulation and ventilation are improperly installed on 75% of my home inspections throughout Massachusetts. This defect can lead to excessive heat loss and most importantly it will cause moisture to build-up and this continued moisture accumulation can effectively develop into major mold problems. I also find that many homes built prior to the early 1980's have an inadequate quantity of insulation installed above and below the living areas. Adequate insulation and Properly designed ventilation in the attic is critical for effective moisture-control and it will pro-long the life of asphalt shingles. For this reason, that is why I'm going to concentrate more on "HOW TO PROPERLY INSULATE AND VENTILATE YOUR ATTIC SPACE".
Before you even start to insulate, always read through the insulation manufacturer's instructions. Skipping any steps and taking shortcuts could mean significant reductions in R-value and a big waste of your money and effort. Allow yourself plenty of time and make sure you have enough materials to complete the entire job. If you're using rolled blankets of insulation, DO NOT open the package until you've hoisted it into the attic. The material will expand significantly (when opened), making it much harder to handle. Always wear goggles, a dust mask or respirator, gloves, long sleeves and long pants when working with insulation. Knee pads are also very helpful in the attic area, especially if there's no flooring in place and you're resting your knees on the floor joists. Be very careful moving around in your attic. Watch out for overhead rafters and those sharp nails that are protruding through the upper roof backings, and walk on the floor joists or sturdy floor boards only. If you were to walk between the floor joists, your foot will fall right through the drywall ceiling below. If you have adequate space in the attic, lay a plywood panel across floor joists to walk or kneel on. Do not allow plywood ends to float inside the floor joists. It's best to have the plywood properly cut to size, so it spans the spacing on the floor joists and sits on the floor joists at both ends of the plywood. Joist spacing will always vary from 16 to 24 or even 36 inches on center.
STEP 1
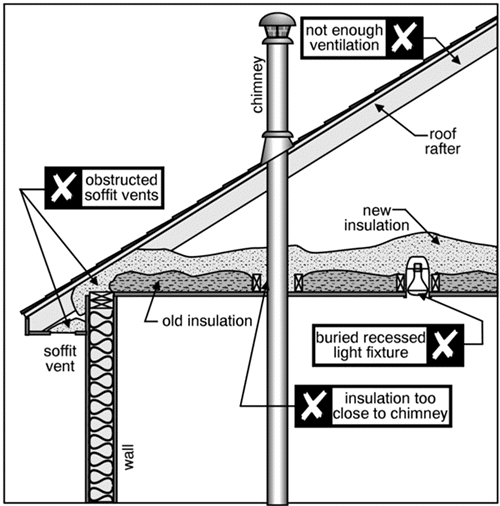
Very important...Make sure you have adequate ventilation installed before any new insulation is in put in place. NEVER cover over any of the existing attic vents, and leave at least one inch of airflow between the insulation and the roof backing, as shown here.
If ventilation is lacking, I recommend a roofing contractor install roof vents on the high side of the roof (preferably a ridge vent) and on the lower eave areas known as soffit vents or drip edge vents. The soffit vents should be equipped with Styrofoam baffles between the interior rafters (attached to the roof sheathing) leading into the soffit area in order to retain the air flow from the soffit area. They're very inexpensive and easy to install, just staple them in place onto the roof backing. Again, never cover the attic vents with the insulation. If your attic does not have roof vents installed, be sure to have a roofing contractor cut-in vents before installing any additional insulation. Your roofing contractor can advise you on what's best for your situation.
STEP 2
HOW MUCH INSULATION DO YOU NEED?
If you purchased (unfaced) insulation, you'll need to install a vapor retarder to prevent moisture damage. You can use pre-packaged vapor retarders or use 4- or 6-millimeter polyethylene sheeting. Vapor retarders should always go towards the warm side of the house. For attics, it needs to go under the insulation. If you purchased insulation with a Kraft-paper or foil facing, this facing should be placed down toward the inner ceiling (warm side of the home), but only the first layer should contain this facing. On any second or third layers, use unfaced blanket insulation or a blown-in insulating material. If you're using left-over faced insulation, you need to peel the paper off or simply slice long slits in the paper/foil facing (vapor retarder) to allow any moisture to pass right through the insulation.
When you're using batts or blankets to improve the existing R-value of the attic, use your utility knife to cut pieces to size. Place any second and third layers of blanket insulation at perpendicular to the lower layer. This technique will help lock in the thermal barrier and prevent any air gaps.
STEP 3
Look for electrical fixtures that protrude through your ceiling, especially recessed lighting. Since these fixtures can become hot when in use, you need to keep insulation a safe distance away from the top of these fixtures. Use a 1" x 4" or 1" x 6" piece of wood to create a retaining wall on all sides of the fixture. Keep the insulation at least three inches away from these fixtures. This application should also apply to the surrounding fireblock area around the chimney.
STEP 4
Fully insulate your attic access area. Keep in mind the most important rule is that you want to insulate any surface that divides inside (conditioned) living areas from outside (unconditioned) spaces. Therefore in an attic space that is not heated nor cooled, the outer most walls should be insulated because it is the barrier between the conditioned and the unconditioned space. In finished attics, the knee space (the outside wall cavities) should be insulated at the outside knee walls studs and inside the floor cavities. Behind a finished knee wall, insulation should not be installed in between the roof rafters. I continuously find this area improperly insulated on the majority of my inspections. A finished portion of the attic should look like this and an unfinished portion of the attic should look like this. Also...See the Diagram at the lower portion of this web page.
STEP 5
If your attic access is comprised of a pull down stairway or a scuttle hole opening, this area must be fully insulated to reduce infiltration and prevent heat loss through this passageway. Latch bolts should be installed to ensure an even tighter seal. There are manufactured insulated boxes on the market that'll fit perfectly over any pull down stairway. Or if your good with your carpentry skills, you can simply make your own box out of plywood and 2 X 4's. Design the box so it sits right along the outside edges of the attic opening and then fully insulate the outside of this box.
STEP 6
If you're hiring a professional to install blown-in insulation (loose fill) into the floor cavities, it's imperative to have them distribute it evenly across the entire attic area. Any gaps, holes or inconsistencies in depth will decrease the R-value. Make sure they are not blowing this insulation inside your already installed soffit vents or baffles, as this will block the air from entering your attic. Your objective for proper energy efficiency in New England's weather is to have 12-14 inches of blanket insulation or 9-10 inches of loose-fill insulation equaling an R-38 value.
RISKS OF ADDING MORE INSULATION
The diagram below is a perfectly insulated home. Let's start at the top and work our way down...
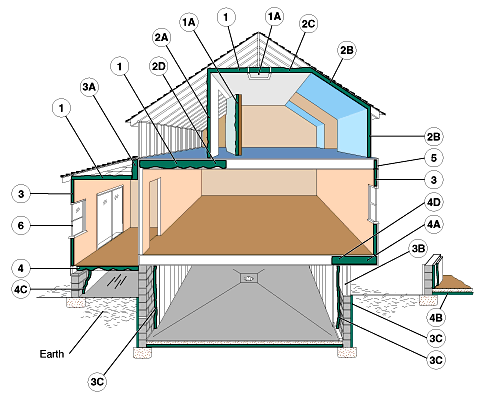
In UNFINISHED attic spaces, insulate between and over the floor joists to seal off all the living spaces below.
1A - Attic access door.
In FINISHED attics (with rooms) with or without a dormer, insulate the following...
2A - Between the studs of the knee walls.
2B - Between the studs and rafters of exterior walls and roof backing. Do not block vents or compress baffles.
2C - Ceiling cavities with cold spaces above.
2D - Extend the insulation right into the joist space (under living area) to reduce any air flows.
Insulate all exterior walls, including ...
3A - Walls between living spaces and unheated garages, shed roofs, or storage areas.
3B - Foundation walls above ground level.
3C - Foundation walls in heated basements, and full walls either on the interior or the exterior.
All floors above cold spaces, such as vented crawl spaces and unheated garages.
Also insulate ...
4A - Any portion of the floor cavity in a room that is cantilevered beyond the exterior wall below.
4B - Slab floors built directly on the ground.
4C - As an alternative to floor insulation, you can insulate the foundation walls of an unvented crawl space.
4D - Extend insulation into joist space (under the living area) to reduce any air flows.
5 - All Band or Rim Joists throughout the exterior wall.
6 - To finalize the efficiency of your home, replace any single pane windows with Thermal Pane windows and caulk and seal around every window and door trim piece.


Comments(6)