Infusionsoft recently launched their brand new landing pages for lead capture. These new landing pages are simple to use, edit, and set up so you can begin marketing the pages for new leads. Below, you will find a step-by-step guide on how to create, edit, and publish your own Infusionsoft landing pages.
What is Infusionsoft?
Infusionsoft is a CRM (Customer Relationship Management) system that has combined itself with online marketing tools such as registration forms, drip email campaigns, if this - then that options, reporting dashboards, landing pages, ecommerce, and more. It is designed to be the all-in-one for companies utilizing those marketing tools, so they can be easily accessed all in one place.
Curious About Infusionsoft?
Contact our team at 702-917-0755 or team@ballenbrands.com for a free consultation to see how Infusionsoft can best serve you and your business.
Ballen Brands created a campaign for lead follow-up for real estate agents using Infusionsoft, called Autopilot ISA, that has seen significant success with clients who have utilized it. This shows Infusionsoft's versatility in what it can do with any industry.
"BAM!! With only launching our Autopilot ISA just a week ago, we have already had a couple of leads respond to an automated text or email BUT the best one is an online lead responded after several of the automated texts, and my buyer’s agent is now working with him and showing homes tomorrow!!!!! The power of automation is something I am looking forward to getting used to. THANK YOU!!!"
- Jeanne Hochhalter, Keller Williams ⭐️⭐️⭐️⭐️⭐️
What is A Landing Page?
As determined by Dictionary.com, a landing page is:
A web page that a user is directed to after clicking on an external hyperlink, often a page designed especially for marketing purposes.
Infusionsoft landing pages are meant to allow you the ability to create these landing pages with Infusionsoft forms without having to use a third-party landing page tool to integrate the two together. When someone completes the form on a landing page in Infusionsoft, it will automatically put that contact into your Infusionsoft database, as well as trigger any follow-up sequences that you have set up, such as:
- Sending an Email
- Sending a Text
- Applying a Tag
- Creating an Opportunity
- and other campaign sequence options
What is An Infusionsoft Form?
Infusionsoft uses forms to capture contact information and enter that information into their contact record in the Infusionsoft database. There are many form options Infusionsoft provides, such as:
- Marketing Forms
- Internal Campaign Forms
- External Campaign Forms
- Landing Page Forms
- etc.
In this instance, the landing pages created by Infusionsoft automatically have forms included in them, so there is no need to create a separate form if you are planning on creating one of these pages.
Also picked for you: 5 Ways to Use Landing Pages in Real Estate
Where Can I Find The Infusionsoft Landing Pages?
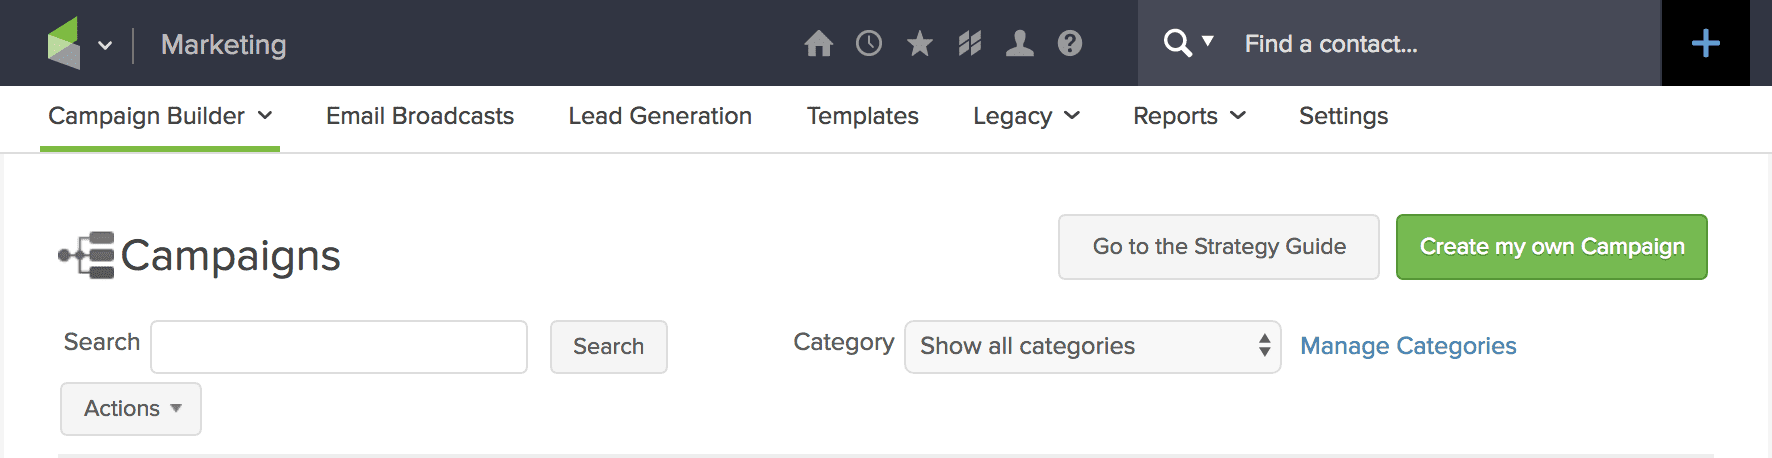
When you log into Infusionsoft: 1. Go to your navigation menu, then go to "Campaign Builder"
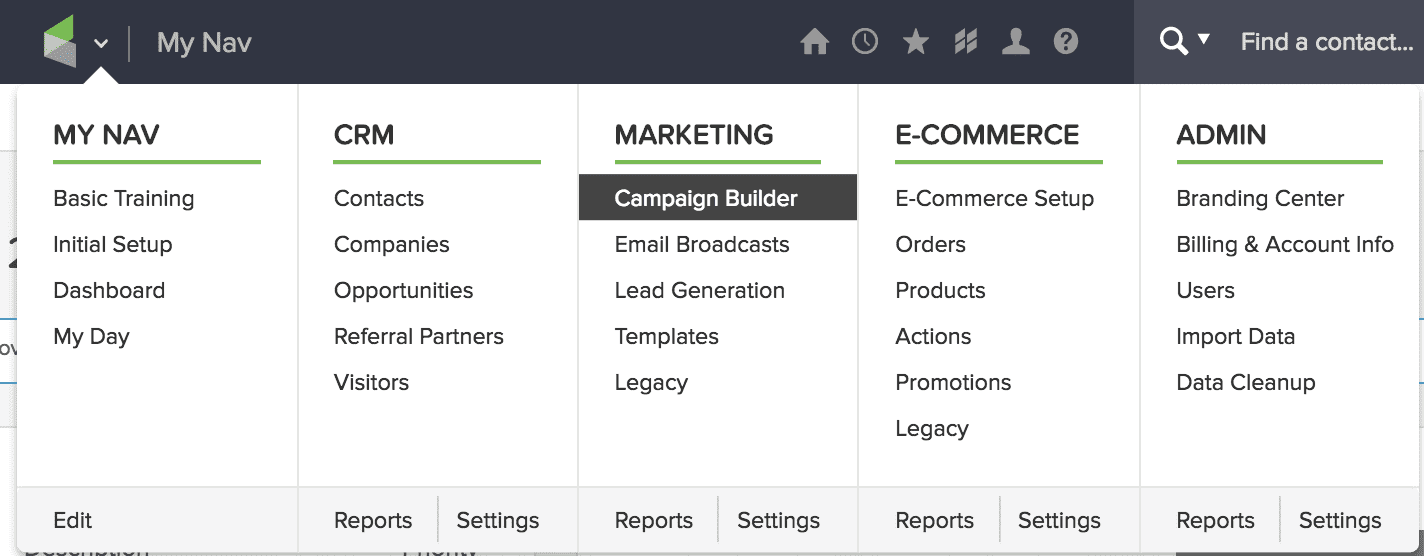
2. Edit an existing campaign or create a new one where you'd like the landing page to appear
3. On the left-hand side of the campaign builder, there will be an icon for landing pages. Simply drag & drop that icon onto the campaign editor and double click to edit it.

Step 1: Choose a Landing Page Template
When you double click on the landing page icon in your campaign, it will take you to a page where you can choose a template or start a page from scratch, as shown below.
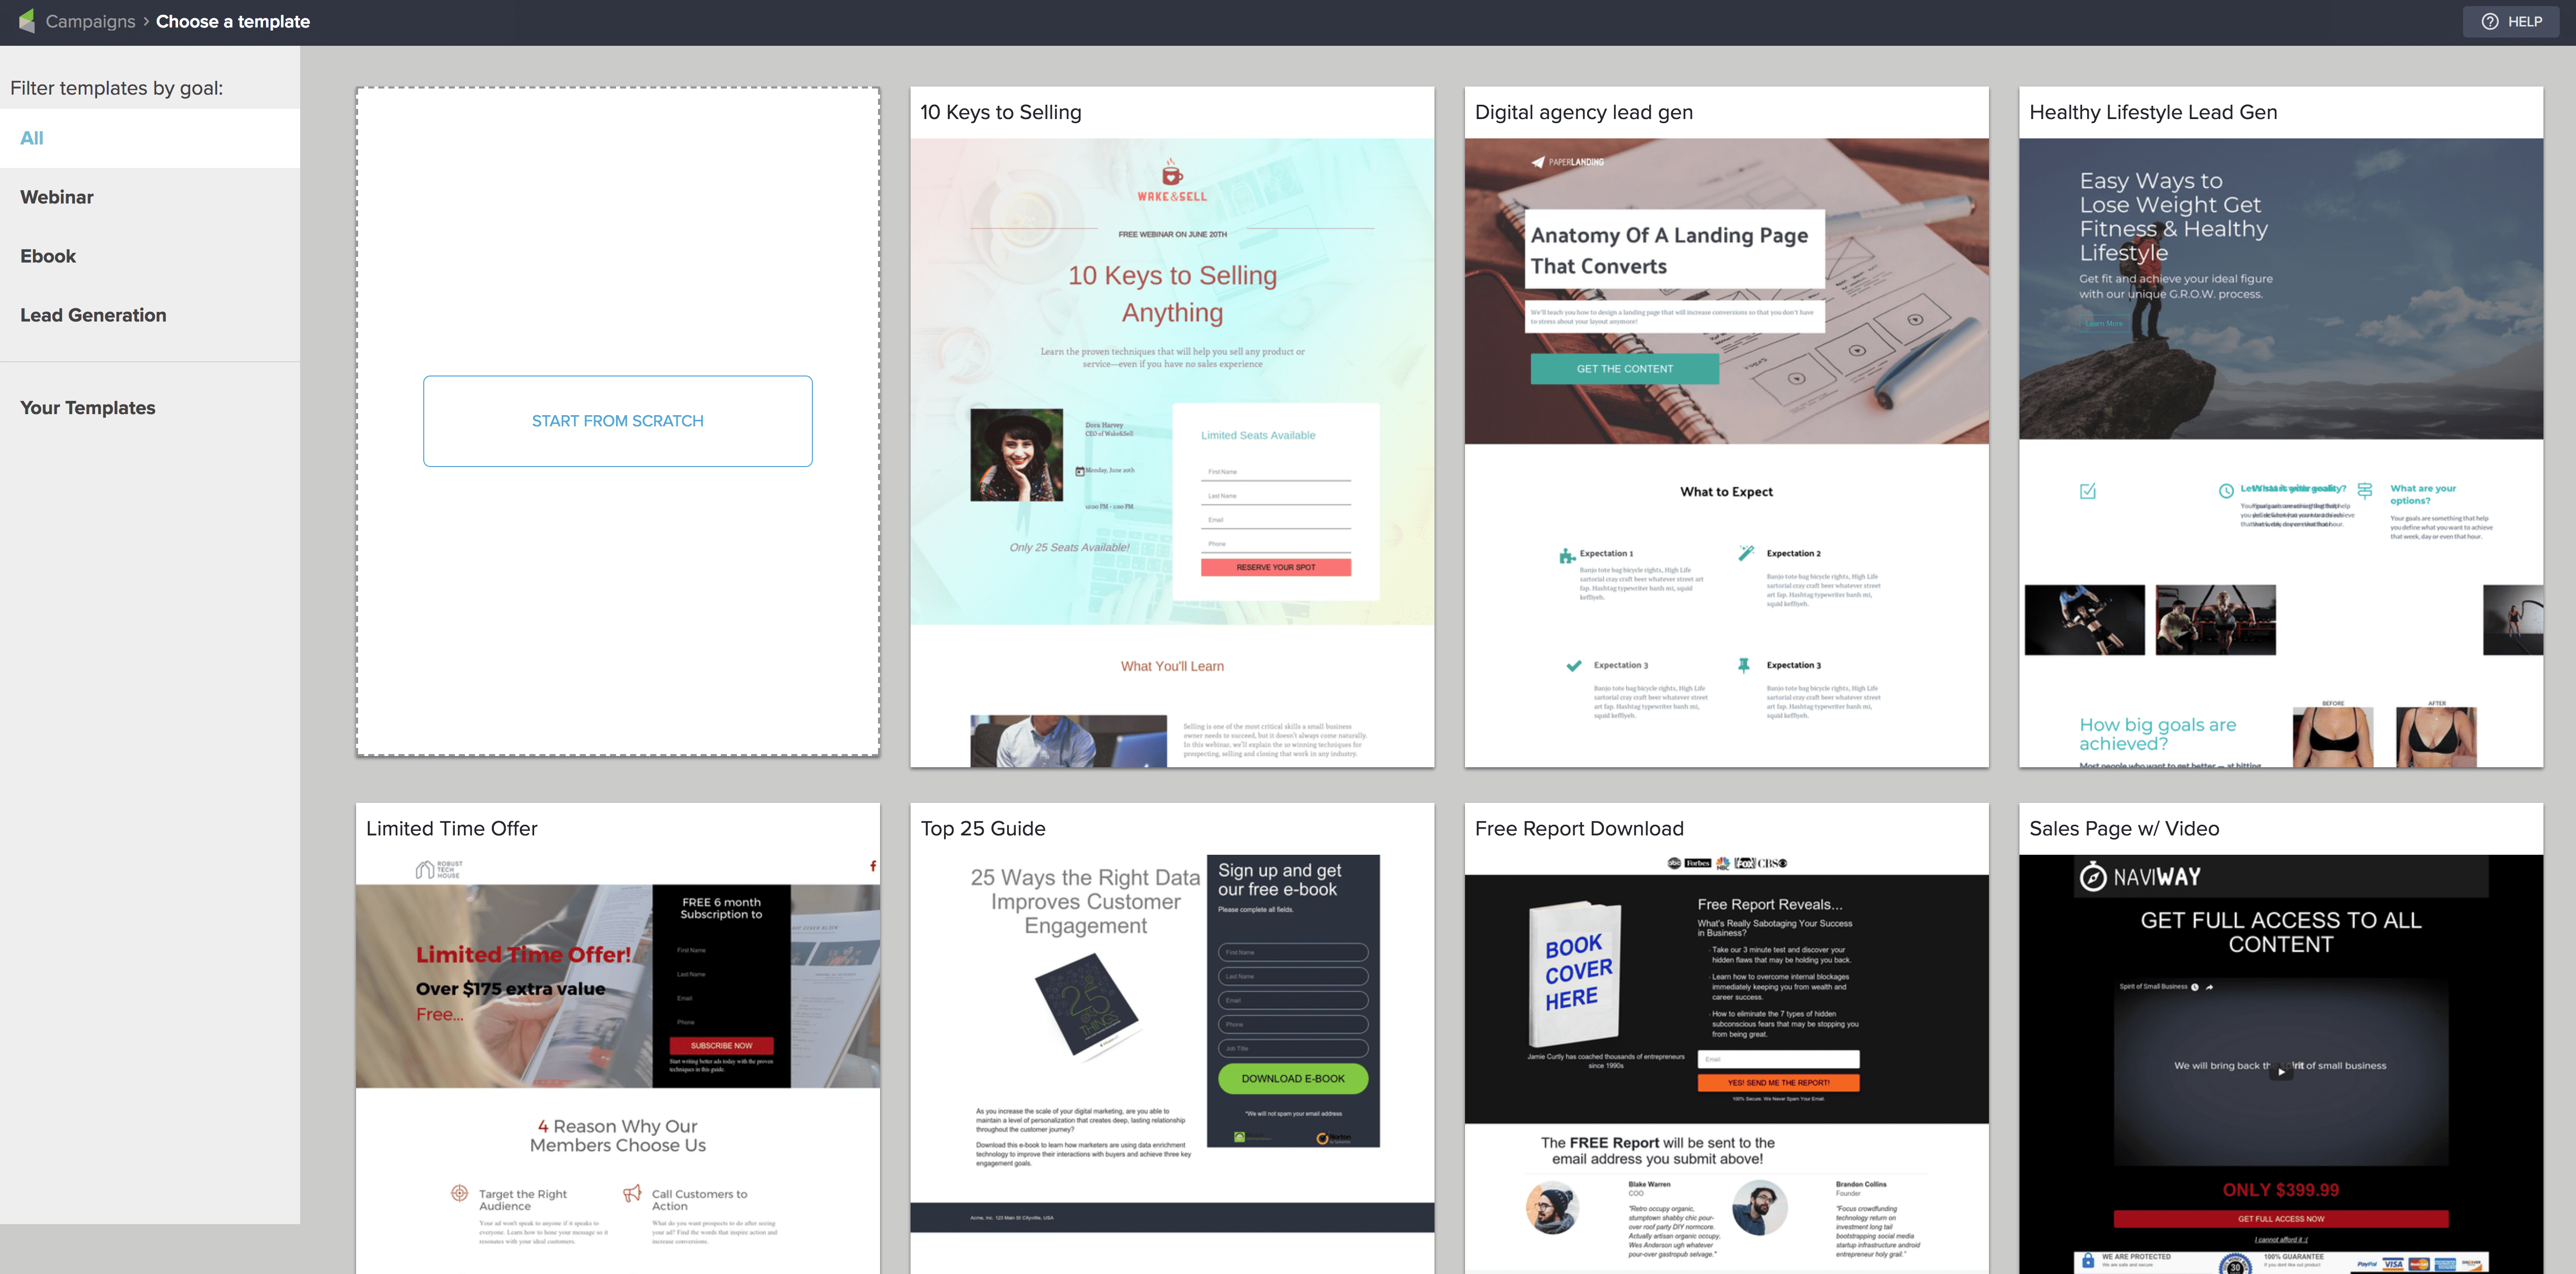
Be sure to preview numerous landing pages before selecting one, as you cannot change the template once you've already chosen one. Currently, there are 3 categories listed on the left-hand side of the template page for you to filter the templates:
- Webinar
- eBook
- Lead Generation
You can also choose to create your own templates, in which you will choose "Your Templates" from the left to find templates you've created.
You might also enjoy: How to Use LeadPages
Step 2: Customizing The Layout
When editing your landing page, you will notice three options on the left-hand side:
- Add Elements
- Add Sections
- Manage Layout
Add Elements
Adding elements to your landing page allows you to add:
- Text
- Images
- Buttons
- Dividers
- Forms
- Icons
- Videos
- Logos
- Code (used for tracking codes, live chat widgets, etc.)
Add Sections
Adding sections to your landing page allows you to add pre-formatted sections for registration forms, calls to actions, buttons, informational sections, testimonials, headers, features, and more.
Manage Layout
This option allows you to manage the current sections and rows on your landing page. From here, you can rearrange, delete, and duplicate sessions, as needed. When you mouse over a section, the section will bounce on the preview of your landing page so you know which section you are editing. If you wish to edit what that section looks like, simply click the gear icon next to the section on the left to display the editing menu on the right-hand side of your screen.

To edit specific elements on the landing page, simply click on the element, and a menu will appear on the right-hand side of your screen with all of the options available to edit that element, such as:
- Replacing the image
- Changing font size
- Changing the color
- Choosing a background image
- Adjusting the alignment
- Increasing/Decreasing spacing
- and more.
**Reminder: an element is a piece of content on your landing page. This could be an image, button, form, text, section, etc.**
Step 3: Customize Your Infusionsoft Registration Form
This is one of the most important steps with your landing page. You want to make sure that your registration form asks for enough information for you to follow up with the lead or get them the information they registered for - but at the same time, you don't want to ask for too much and deter them from completing your form. One of the most common layouts for free items in registration forms is simply asking for the first name and email to be able to deliver that free item to their email properly. When you click on the form, the edit form options will appear on the right-hand side of your screen. You will notice two major form buttons:
- Add a Contact Field
- Add a Virtual Field
Contact fields are fields that are pulled into the contact's record directly and includes:
- Phone
- Fax
- First Name
- Middle Name
- Last Name
- Preferred Name
- Website
- Birthday
- Address
- and any custom fields you may have set up in the system.
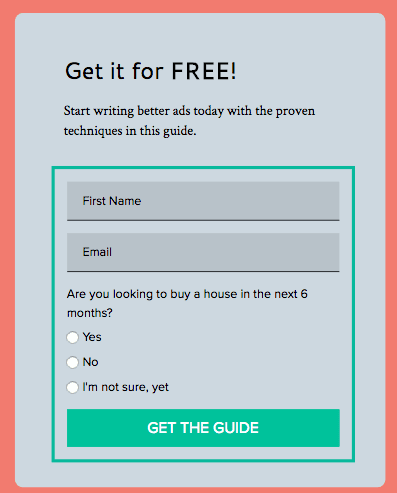
Virtual fields are fields that aren't saved in the contact's record fields directly, but can still be found when viewing the customer's form history and selecting this specific form. Virtual fields include:
- Drop Down
- Radio
With virtual fields, you can choose to ask the person registering a specific question that may help determine where they go next in your campaign. You can have each option in the drop-down or radio section apply a specific tag based on the visitor's choice. An example is shown below of a form with a virtual radio field:
You may also choose to have a tag applied when a contact completes the form entirely. Tags can be used to trigger additional campaigns or simply be saved on the contact record for use to find contacts in the future based on that specific tag.
Tags in Infusionsoft are typically used for segmenting contacts in the system. They can be used to see what actions contacts have taken, what they have downloaded, what they have interacted with, etc. Tags can also be used to start and stop campaigns.
Related: Using Infusionsoft Campaigns to Automate Your Marketing
Step 4: Creating a Thank You Page
When you are finished setting up your landing page, you can click "next step" in the lower-right hand corner to be taken to the options for setting up your thank you page. Infusionsoft gives you two options for setting up a thank you page:
- Redirect to an external URL (a page you have already created somewhere else)
- Design a thank you page using the landing page editor
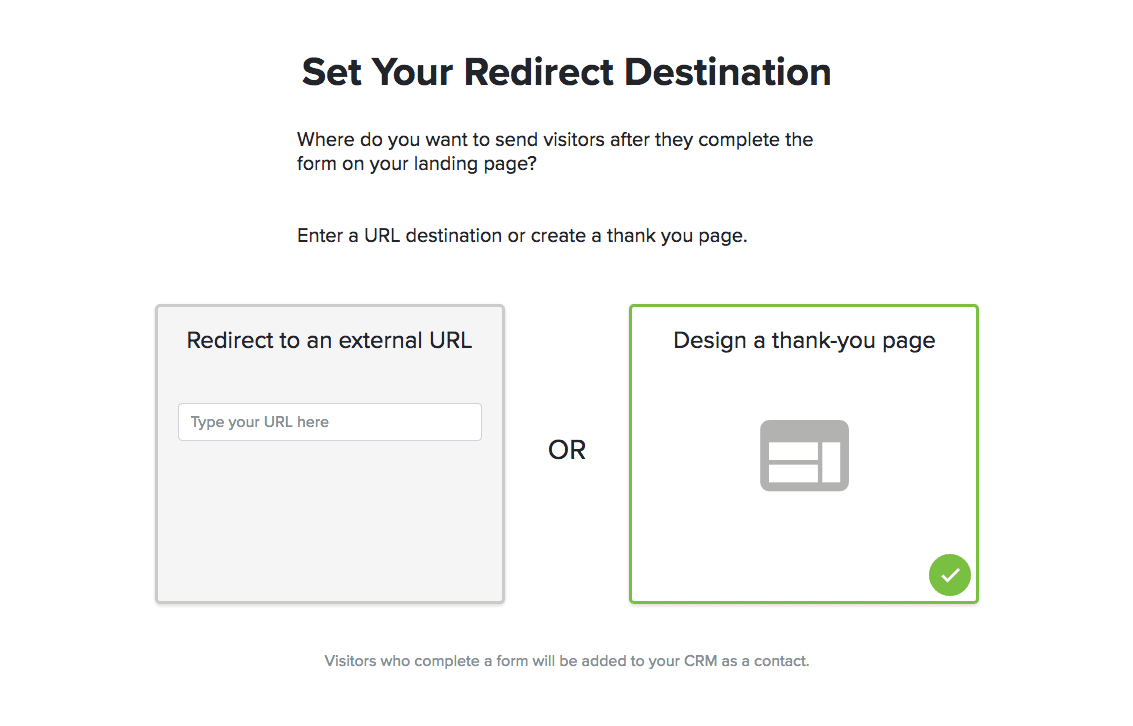 If you choose to design a thank you page, you can click "next step" and be taken to a page very similar to what you saw with the standard landing page editor. Simply design your thank you page to your liking and you are good to move to the next step! Some common things to add on a thank you page are:
- Instructions on what's going to happen next. When the email will arrive, who to contact if it doesn't, instructions to check their spam folder, etc.
- A link to a product, sale, coupon, etc.
- A link back to your website/blog so the visitor can continue browsing other elements.
The essential goal is to ensure that you don't lose the contact after they've completed their registration. Give them something else to interact with so they go back to your website and continue interacting with it. The more visitors interact with your website, the more valuable search engines will see your website for the content that person is viewing, and the higher you may potentially rank for that content.
Step 5: Publish Your Landing Page
Once your landing page is all set up with both the registration and thank you page, you are good to publish your page! The publish page provides you with options to:
- Add Javascript codes for Facebook Pixel/Google Analytics
- Share your URL by copying and pasting or by using the social share icons provided (if you want your own custom URL and you use WordPress, step 6 will be able to help with that)
- Embed your landing page on your website using an html code
- Edit what your page will look like when shared on social media
- Set up a custom domain or subdomain that you want this landing page to be hosted on (does not work with domains with a website already hosted on them)
Step 6: Installing the Plugin for WordPress
If you are using a WordPress website, you will definitely want to install the Infusionsoft Landing Page Plugin. You can visit the page to download the plugin by clicking here.
To install the plugin:
- Click on "plugins" on the back-end of your WordPress website
- Click "add new"
- Click "upload"
- Find the file on your computer and upload it into the WordPress plugin uploader.
- Once it's installed, you will be prompted to activate the plugin.
- Once activate, you're good to go!
To find the plugin:
- Go to "settings" on the back-end of your WordPress website
- Click "Infusionsoft Landing Pages"
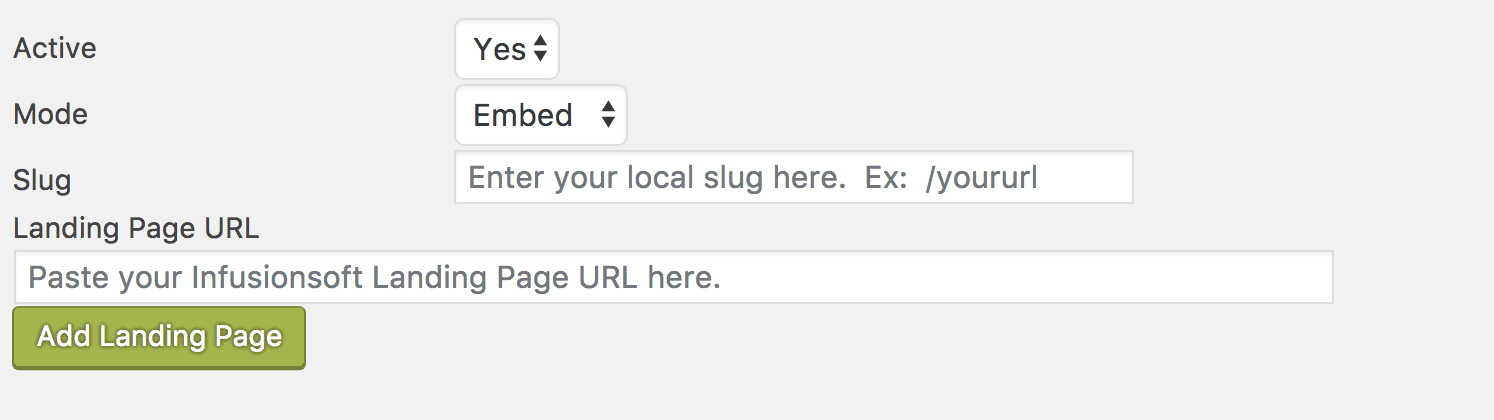
On that screen, you will be provided with the option to exit existing landing pages you've already added to your website and add new landing pages to your website. The best settings are selected by default, simply enter a slug and the url for your landing page to save it on your website.
Creating a Slug
Slugs are ideally about 1-3 words long and are what come after your primary domain name. For example: loriballen.com/blog. "blog" is the slug. So if your landing page is titled "How to Sell a House eBook," you may wish to make the slug sell-house-ebook.
Finding the Landing Page URL
From the "Launch" step in the landing page process (the final step after creating the thank you page), you will find your landing page's URL in the same section as the social share links. Simply copy that URL and paste it in the plugin settings where it asks for the landing page URL.

Once saved, you'll be able to access the page on your website by typing in your domain name followed by the slug you created to view your landing page. That's the page that is recommended to share in emails, social media, etc. because it is going to be branded with your domain name specifically.
Also Picked for You: How to Use Listings to Leads to Customize Single Property Pages
Infusionsoft Landing Page Support
If you need support while working on your landing pages, Infusionsoft has set up a live chat with their landing page team. To access this chat, simply click the "help" button in the upper-right corner of the screen while editing your landing page.
Sign Up for Infusionsoft
Contact our team at 702-917-0755 or team@ballenbrands.com for a free consultation to see how Infusionsoft can best serve you and your business.

Comments(0)