HOW TO PLACE AN IMAGE ON YOUR BLOG
Recently someone was having a difficult time working with the image insert forms to properly place images on the page. There are people on the forum who are much more experienced with this than I am, but I do know how to do it so I'll attempt to explain my method.
Section 1.10.32 of "de Finibus Bonorum et Malorum", written by Cicero in 45 BC "Sed ut perspiciatis unde omnis iste natus error sit voluptatem accusantium doloremque laudantium, totam rem aperiam, eaque ipsa quae ab illo inventore veritatis et quasi architecto beatae vitae dicta sunt explicabo. Nemo enim ipsam voluptatem quia voluptas sit aspernatur aut odit aut fugit, sed quia consequuntur magni dolores eos qui ratione voluptatem sequi nesciunt. Neque porro quisquam est, qui dolorem ipsum quia dolor sit amet, consectetur, adipisci velit, sed quia non numquam eius modi tempora incidunt ut labore et dolore magnam aliquam quaerat voluptatem. Ut enim ad minima veniam, quis nostrum exercitationem ullam corporis suscipit laboriosam, nisi ut aliquid ex ea commodi consequatur?
The sample text above is just to show how the text will wrap around the photo maintaining the selected Vertical and Horizontal space.
The photo above has been placed using the following criteria:
- Dimensions: 250 px width
- Constrained Proportions box checked
- Alignment: Right
- Vertical space: 8 px (larger the number the more space)
- Horizontal space 8 (larger the number the more space)
- Border: 3 (larger number is larger border)
- Style is the sum of the above and fills itself out.
- You can fill that style out if you know how but not necessary.
- I did type in a color change from the default black to brown.
You'll notice that the brown border is size 3 px which is neither too large nor to small.
After the photo was inserted I changed the text from Left to Justified, which gives a clean edge by the photo.
The Horizontal space of 8 keeps the text a reasonable distance from the photo, again to make a clean pleasing white space.
STEP BY STEP
On the Blog Draft page, click on the green tree icon on the top right of the Draft tool bar. The following page will come up.

Click on the icon to the right of Image Url
Another page will pop up.
On that page, click on Browse. Then browse your computer to select the photo.
After it's selected, click on Upload.
The photo will show up in it's actual size in the Preview window and the Image URL will show in the top field.
Type in a Description of your photo
Type in a Title of the photo. That is what is seen when a mouse pointer is on the photo.
Now click the Appearance tab and the following window will show up.

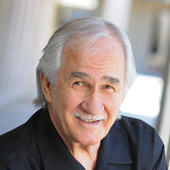
Alignment Tab: I only use the Left or Right selection. Either I want the image on the Right side as the image of the lady is, or I want it on the Left side. That way text will wrap around. The little tree image with the text will show you how the picture will look with your selection.
If I want the photo centered, then I leave Alignment "not set". After the photo is on the page, I click on it and then click on the Center Text icon on the tool bar. I usually do that with large photos such as these that are 400 px
Dimensions: First make sure the Constrain Proportions box is checked. Then all you have to do is select the Width you want to have the photo and it will reduce keeping the same proportions.
Once you have the photo on the page if you want to resize it you can click on it and drag the corners to resize, being careful to keep the same dimensions. Best to know the dimensions you want and not have to resize.
Vertical Space: This will determine the amount of white space on top and bottom of the image. Begin with 8 and experiment.
Horizontal Space: This determines the white space on the sides of the image. Begin with 8 and experiment.
Border: This is the thickness of the border. Begin with 3 and experiment to see what you like.
Style: This field shows what you have selected in the fields below. You can change them. I changed the color of each pic above from black to a brown, a green, and a blue. Experiment to see what works for you.
SEQUENCE:
- First I type the entire blog
- Next I determine what pictures I want and where I'll place them.
- Then I place the cursor where I want a photo and start uploading them one by one.
- After uploading I adjust the text as necessary.
- Save the draft to see how the finished product looks
- Go back and do more adjusting.
- After everything is the way I want it, I Justify the text around the photos to give an organized even look
- If I need to insert a Map, I do that as the last item because it has to be inserted using html. If you do it early, it doesn't always come out right.
- Remember that the WYSIWYG and the HTML are not tied together. You must save the draft of the WYSIWYG before selecting HTML, and vice versa.
Comments(66)